With Halloween just around the corner, celebrating the night with a perfect cake is a serious task for both cake makers and customers. To bring your Halloween celebration to a whole new level with intricate cakes, you've come to the right place.
In this article, we'll cover four sinuous Halloween cake ideas, overviewing all the steps to create them. Some recipes are designed to be approachable, even for novice bakers, while others are for more skilled cake makers. Feel free to try all of them so that you can enjoy the creative process as much as the result.
Luckily, Halloween leaves enormous space for imagination. With these Halloween cakes recipes, you can move away from classic designs and basic decorations to something more intricate. Classic monsters, haunted houses, ghosts, eerie spirits, and traditional pumpkins are only a small part of the Halloween theme.
So, let’s get started with a few easy Halloween cakes that are bound to make your Halloween celebration a hauntingly good time.
Mini-pumpkin cakes
Pumpkins play a huge role in Halloween celebrations around the world. In many countries, pumpkin is a popular go-to ingredient for many dishes and desserts. However, in Australia, the culinary use of pumpkin lacks the widespread enthusiasm found in, say, the United States. As an ingredient, the pumpkin is underappreciated, so let’s explore a few delectable recipes that boast a gentle and nuanced flavor.
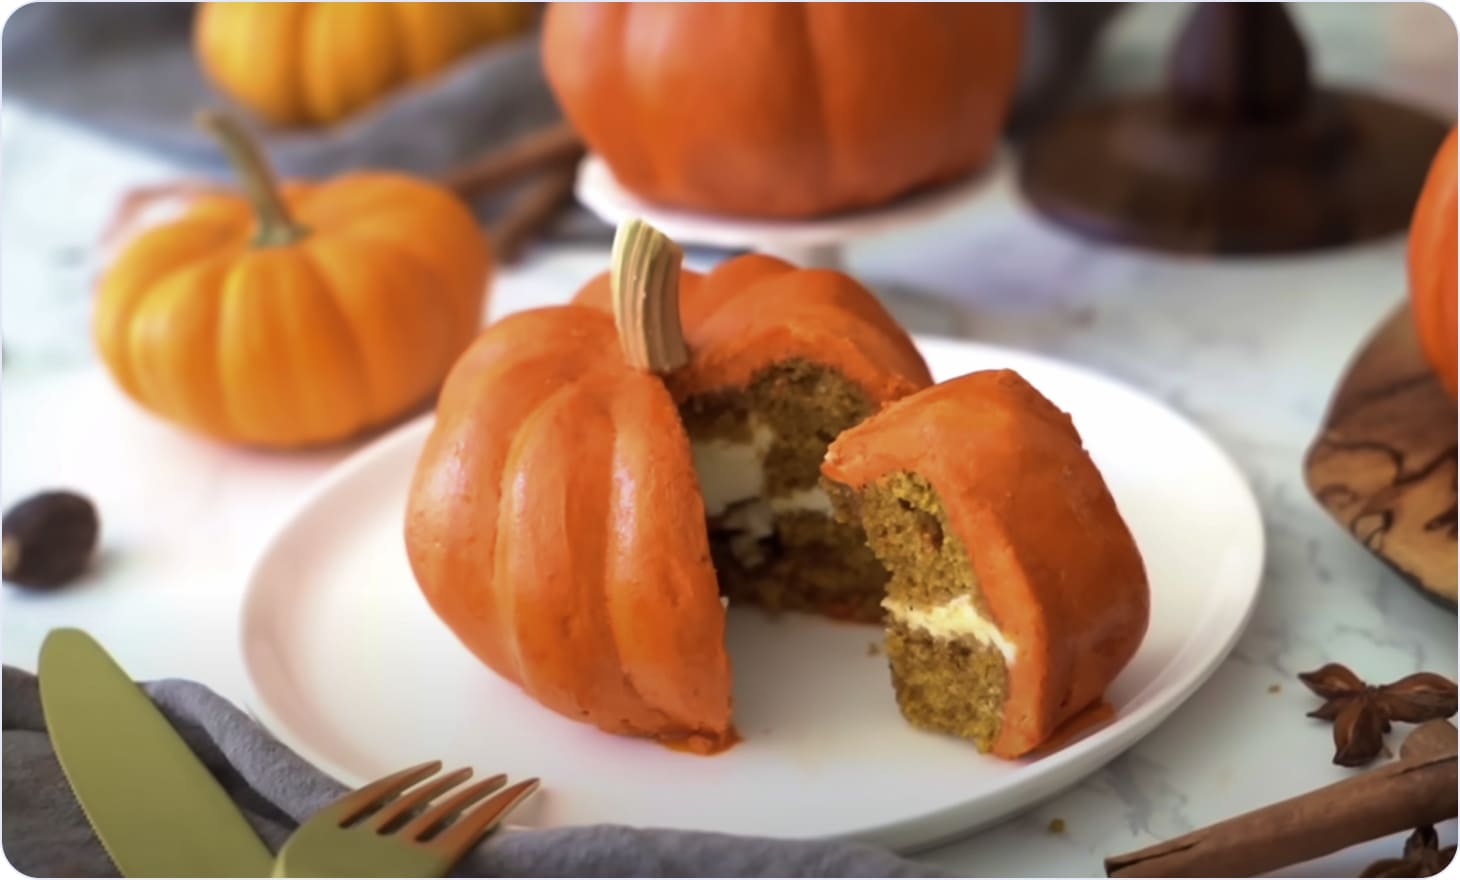
To start with simple Halloween cakes, meet small Halloween pumpkin cakes. They are enriched with fall spices and cream cheese frosting to be the centrepiece of your festive table. As the author notes, it takes 30 minutes to prepare and 20 minutes to bake it, allowing you to make it under an hour in total!
Source: Preppy Kitchen
Ingredients
For the cake itself, you will need:
- 3 cups (420g) all-purpose flour;
- 1 pinch nutmeg;
- 1 teaspoon (5g) baking soda;
- 2 teaspoon (10g) cinnamon;
- 1 spoon (5g) baking powder;
- 1/4 teaspoon (1.25g) allspice;
- 1 pinch ground cloves;
- 2 cups (400g) sugar (granulated sugar);
- 1/4 cup (50g) brown sugar;
- 1/4 teaspoon (1.25g) ginger;
- 1/2 cup (120ml) melted coconut oil;
- 1/4 cup (60ml) vegetable oil;
- 1/3 cup (80ml) plain yoghurt;
- 1 can pumpkin puree (425g);
- 1/2 teaspoon (2.5g) salt;
- 3 large eggs;
To prepare a cream cheese frosting, you will need:
- 8 oz (225g) softened cream cheese;
- 2 cups (460g) powdered sugar;
- 1 teaspoon (5 ml) vanilla extract;
Lastly, to create buttercream, use:
- 1 cup (226.8g) salted butter;
- 1 teaspoon (5ml) vanilla extract;
- 1 lb (454g) icing sugar (confectioners);
- 1/4 cup (60ml) milk;
- 10 drops of orange food colouring (the amount of food colouring will depend on the brand used and the desired colour).
Step-by-step guide
For your convenience, let’s divide the process into steps, where we’ll cover the baking process and how to create frosting and buttercream. Such approach would be more friendly and understandable to follow.
Alternatively, you can watch the video guide by the author.
Baking
Begin by preheating your oven to 350°F (175°C). Grease and flour your mini bundt pans, ensuring they are well-coated to prevent sticking.
In a mixing bowl, combine the melted coconut oil and granulated sugar. Blend them together until you achieve a creamy consistency. Then, introduce the plain yoghurt into the mixture and thoroughly combine.
Gradually add the eggs, one at a time, ensuring each egg is fully incorporated before adding the next. In a separate bowl, sift together the remaining dry ingredients, including the all-purpose flour, baking powder, baking soda, cinnamon, ginger, allspice, ground cloves, nutmeg, and a pinch of salt.
Incorporate the dry ingredients into the sugar-egg mixture in three separate batches. Alternate this with the addition of pumpkin puree. Mix the ingredients together until they are just combined.
Carefully spoon or pipe the cake batter into the prepared mini bundt pans, filling each about two-thirds full.
Bake in the preheated oven at 350°F (175°C) for approximately 20 minutes or until a wooden skewer inserted into the centre of the cakes comes out clean. Then, allow the cakes to cool in the pans for approximately 10 minutes before gently inverting them onto a wire rack to cool further.
Want to monetise your cake-making skills? Become a cake maker! Sign up now
Cream cheese frosting
In a separate bowl, beat the cream cheese until it becomes smooth in texture.
Add vanilla extract and powdered sugar to the cream cheese. Continue to mix until the ingredients are fully incorporated and you achieve the desired consistency for your frosting.
Buttercream
Start by beating the room-temperature butter until it becomes light and fluffy.
Add vanilla extract and gradually introduce the confectioners' sugar. Mix well after each addition.
Add milk to the buttercream a few tablespoons at a time, mixing until you reach your prefered consistency. It's recommended to aim for a stiffer buttercream, so you may use less milk.
Finally, incorporate the orange food colouring into the buttercream, adjusting the amount to achieve your desired shade.
Assembly
To create a more stable base for your pumpkin cakes, trim the bottoms as needed. The extent of trimming can affect the final shape, so adjust to your preference.
Apply the cream cheese frosting to the bottom of one mini bundt cake, either by piping or spreading it, and sandwich it together with another cake.
Cover the cake duo with the orange buttercream and sculpt it into a pumpkin shape. You can fashion tools, such as a rounded-off "V" shape for creating indents and a straight edge for smoothing the sides, from a cut-up yoghurt container.
Top your pumpkin-shaped cake with a stem. A real pumpkin stem works well, but you can also create one using fondant or a thick buttercream.
These steps will result in delightful mini pumpkin cakes that are perfect for your Halloween celebration. Enjoy!
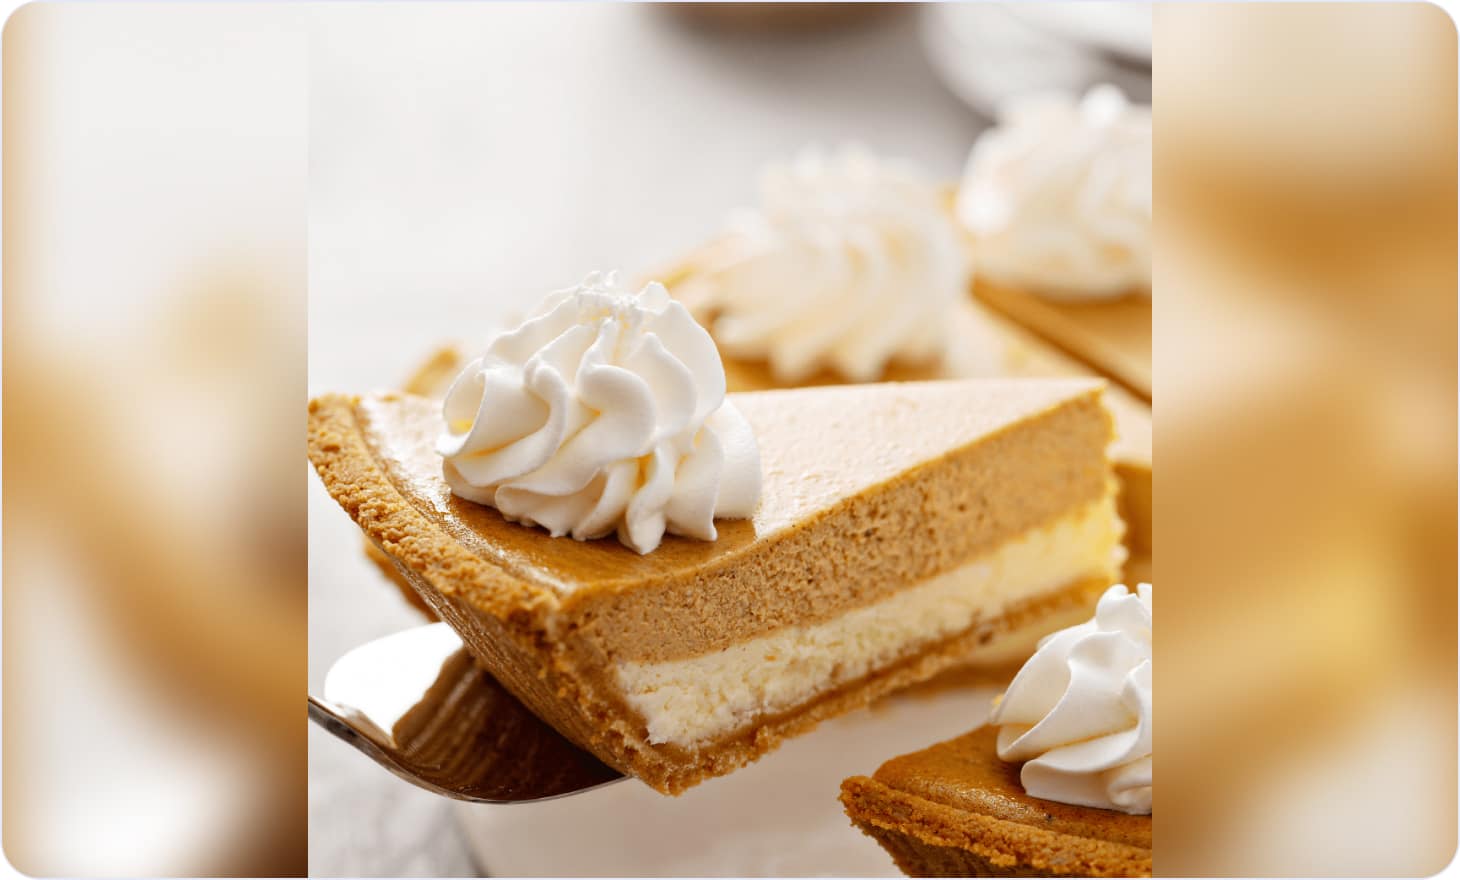
Pumpkin Cheesecake
Originally loved by the English, cheesecakes made the entire world fall in love with them. With the gradual expansion of the British empire, cheesecakes made their way into many countries, becoming one of the most popular desserts.
Source: Insanely Good Recipes
For Halloween, though, pumpkin is a vital addition, so let’s see how to create pumpkin cheesecake for your celebration. Traditionally, let’s start with the ingredients you will need.
Ingredients
- 1 pinch ground nutmeg;
- 2 large eggs;
- 1/2 teaspoon (2.5ml) vanilla extract;
- 1 (9-inch) prepared graham cracker crust;
- 2 (8 ounces) (225g) packages of softened cream cheese;
- 1/2 cup (120g) pumpkin puree;
- 1/2 teaspoon (2.5g) ground cinnamon;
- 1/2 cup (100g) white sugar;
- 1 pinch ground cloves;
- 1/2 cup (120g) frozen whipped topping (thawed).
Step-by-step guide
Start by preheating the oven to 350°F (175°C). Then, prepare the crust if you’re making it from scratch; otherwise, place your pie crust on a baking tray.
Mix together the cream cheese with the sugar and vanilla until smooth, making sure to scrape your bowl as you go. Then, add eggs one at a time, gently incorporating them individually.
Remove 1 cup of the batter and place it in a separate bowl. Spread the remaining batter over your pie crust. Then, put the pumpkin puree and spices in with the 1 cup of cheesecake mix and gently blend until smooth. Carefully spoon this over the cheesecake batter, spreading to the edge of the pie (alternatively, spoon dollops over the top and swirl together with a skewer).
Lastly, bake for 35 to 40 minutes, checking that it is done with a gentle nudge before removing from the oven. After it’s done, leave the cheesecake to cool on the counter, and then place it in the fridge for at least 3 hours, if not overnight.
Tips for making the best cheesecake
There are many handy tips to create cool Halloween cakes, considering how diverse and intricate they can be.
To start with, remember that starting with ingredients at room temperature is a smart move for this recipe and for many others. It makes blending the softened cream cheese with other ingredients a breeze, ensuring there are no annoying pockets of unmixed cream cheese. Not only can you prepare this recipe in advance, but the taste also gets even better with time. Letting it set for a while allows the flavours to meld into a creamy and perfectly firm cheesecake.
Here are some additional handy tips:
- While mixing your cream cheese mixture, remember to scrape the sides of the bowl; the mixture tends to cling there.
- To avoid spills and simplify cleanup, always place your pie dish on a baking tray.
- Bake until the centre of the cheesecake has a slight jiggle. The edges should be firm, while the central few inches should give a bit when gently nudged.
- Let your cheesecake cool nearly completely on the countertop before refrigerating to prevent unsightly cracks.
- If you decide to double the recipe and use a springform pan, be ready to bake it for at least an hour. You might also find that cooling it in the oven helps it set perfectly.
Graveyard vanilla sheet cake with chocolate-cinnamon filling
Pumpkins are not the only thing Halloween is popular for. There are tons of attributes to this holiday that people love. So, let’s switch our focus from the filling to Halloween cakes decorations ideas.
Among a myriad of creepy Halloween cakes, this graveyard vanilla sheet cake would be a great treat for your celebration. Published by Emily Nabors Hall, a vanilla sheet cake will serve as a base for our Halloween graveyard cake.
Source: Country Living
According to the author, here’s what you’ll need for it.
Ingredients
- 1 teaspoon (5g) ground cinnamon;
- 1 1/2 teaspoons (7.5g) of baking powder;
- 1/2 teaspoon (2.5g) of Kosher salt;
- 3 cups (420g) of all-purpose flour (spooned and levelled);
- 1 cup (150g) of crispy rice cereal;
- 1/4 cup (50g) of packed light brown sugar;
- 2 4-ounce (225g) bars of bittersweet chocolate (chopped);
- 1 cup (225g) of unsalted butter (at room temperature);
- 2 cups (400g) of granulated sugar;
- 3 large eggs (room temperature);
- 1 tablespoon (15ml) of vanilla bean paste;
- 1 cup of milk (240ml) (at room temperature);
- Chocolate frosting.
Step-by-step guide
Traditionally, start by preheating the oven to 350°F (175°C). Lightly grease a 13-by-9-inch baking pan. Whisk together flour, baking powder, and salt in a bowl.
Pulse chocolate, cereal, cinnamon, and brown sugar in a food processor until chocolate is finely chopped 10 to 12 times.
Then, beat butter and granulated sugar with an electric mixer on medium speed until light and fluffy, 1 to 2 minutes. Add eggs, one at a time, beating to incorporate after each addition. Beat in vanilla bean paste. Reduce speed to low and beat in the flour mixture and milk alternately, starting and ending with the flour mixture, just until the flour is incorporated.
Pour half of the batter into the prepared pan. Sprinkle the chocolate mixture evenly over the batter and top with the remaining batter.
Lastly, bake until a toothpick inserted in the centre comes out clean, 30 to 35 minutes. Cool completely in a pan on a wire rack. Then, add a finishing touch with chocolate frosting.
Decoration
To give this cake a touch of a Halloween theme, we’ll style it as a graveyard.
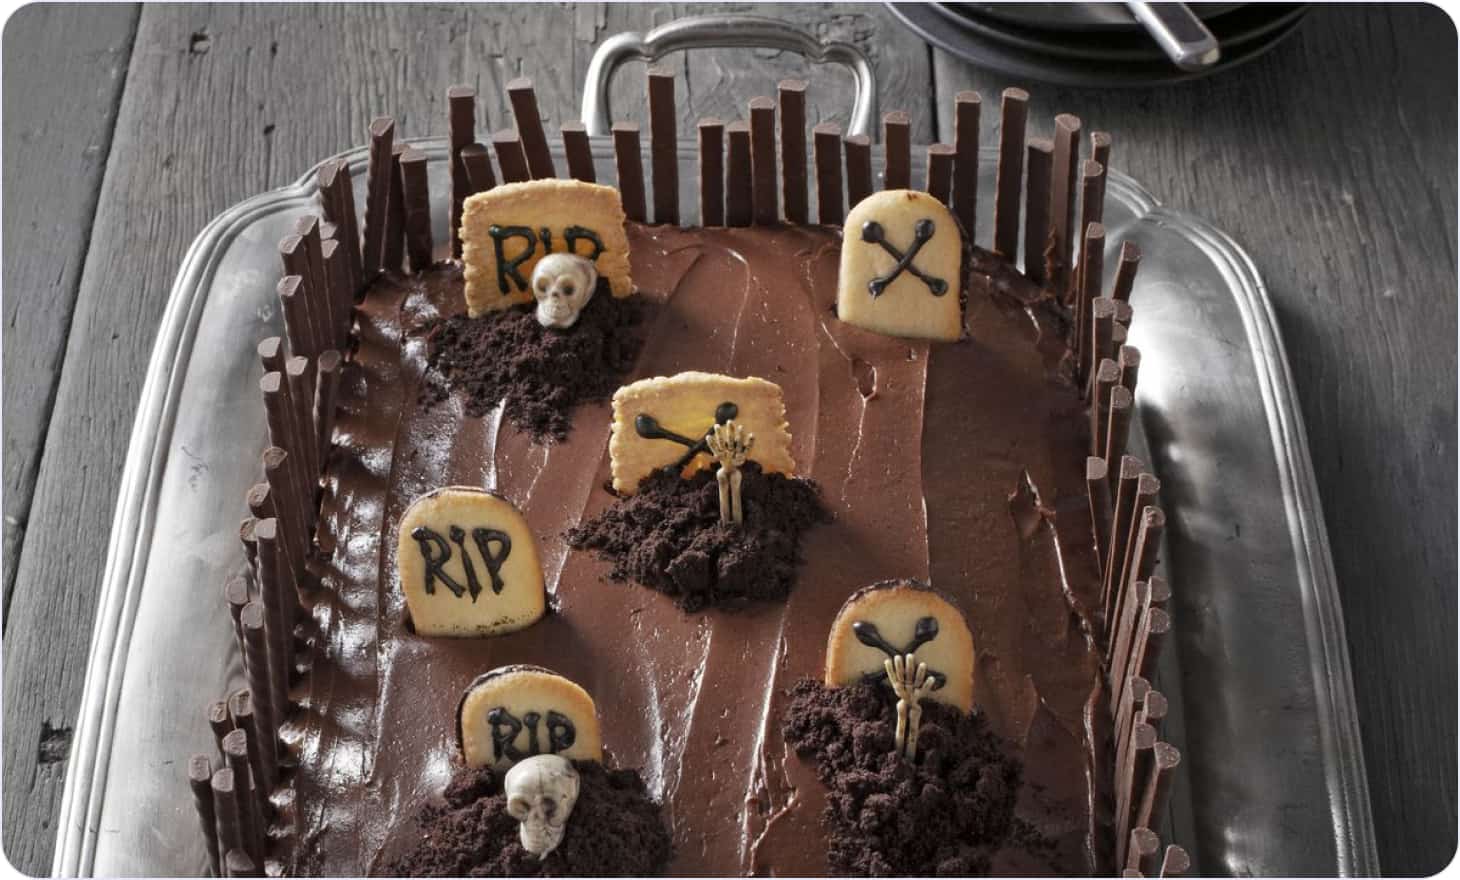
Source: Country Living
To do so, you will need:
- Chocolate frosting;
- Pepperidge Farm Milano and/or Bordeaux cookies;
- Crushed chocolate wafers;
- Rademaker chocolate sticks;
- Small plastic toys for decorating;
The decoration process can basically be done in three simple steps:
- Give those tombstones their own unique character. Start by loading some rich chocolate frosting into a resealable plastic bag, then seal it tight and snip off a tiny corner. Now, let your creativity flow as you pipe out 'RIP' or 'X' on the upper half of each cookie.
- Next, for that eerie graveyard effect, press these decorated cookies into the cake, creating an arrangement as shown. To add a touch of realism, pile crushed chocolate wafers in front of a few tombstones to conjure up convincing dirt mounds.
- To frame your spooky cemetery scene, line the perimeter of the cake with a rustic fence made from Rademaker chocolate sticks, cut to various heights. It's these little details that make your Halloween cake truly extraordinary.
- Now, for the grand finale, insert small plastic skeletons into the cookie-crumb dirt. Watch as your graveyard comes to life, giving your Halloween cake a spine-chilling and unforgettable touch.
Looking to sell your Halloween cakes? Do it with CakerHQ! Sign up
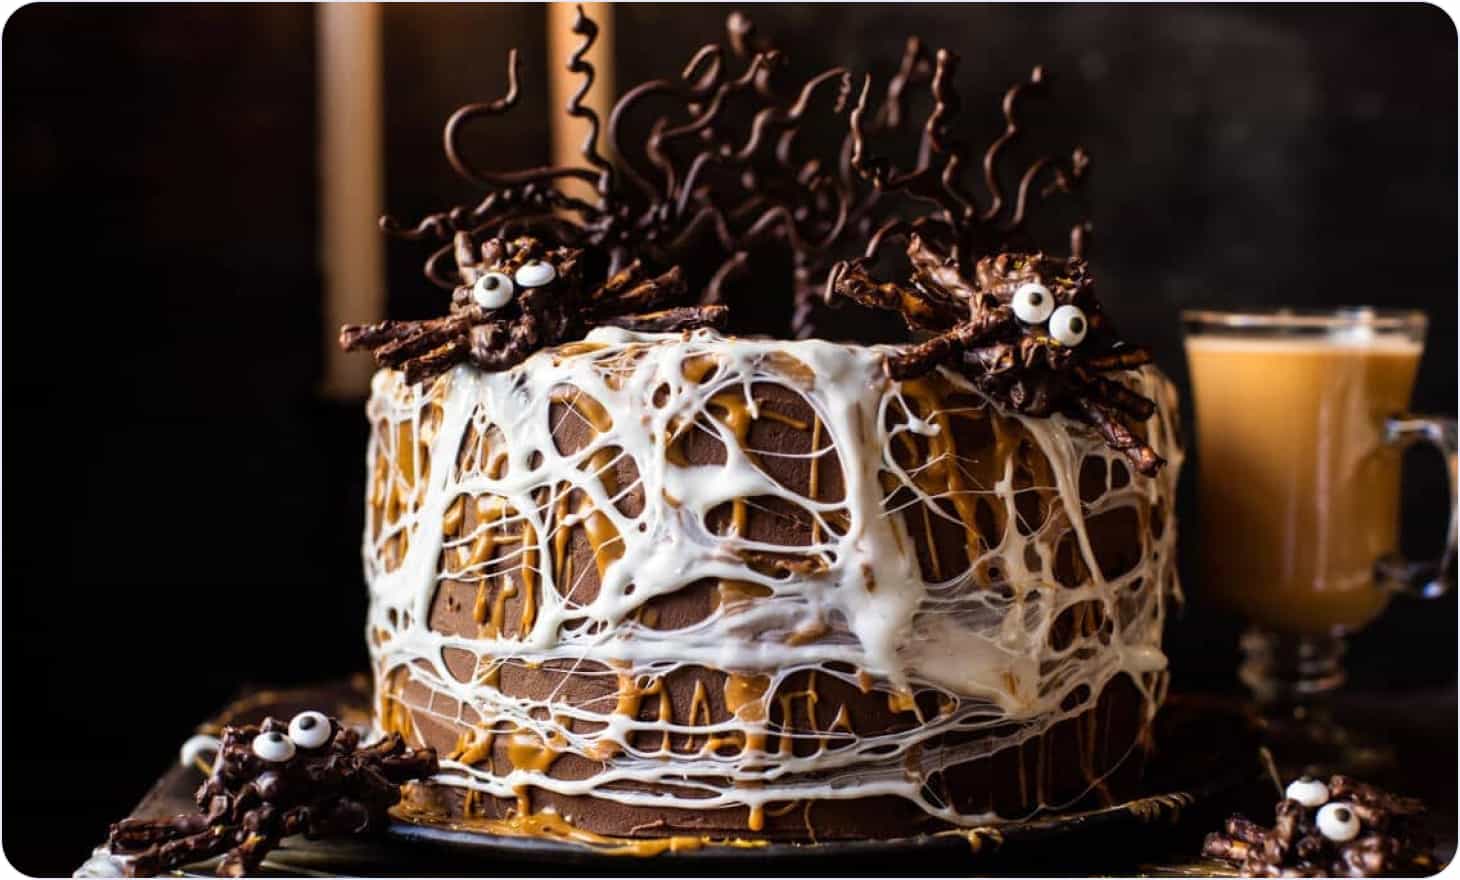
Forbidden Forest butterbeer chocolate cake
Among all the Halloween themed cakes, this one deserves your attention. This cake isn't just delicious; it's also a spooky masterpiece in the scary Halloween cakes niche. Picture a velvety chocolate cake as dark as the night, paired with intricate web-like decorations inspired by the eerie inhabitants of the Forbidden Forest. The ultimate Halloween dessert brings haunted gathering vibes mixed with a wonderful flavour.
At the core of the cake lies a chocolate cake. Then, it is generously complimented with butterbeer sauce and decorated with marshmallow spider webs, pretzel spiders, and chocolate trees.
Source: Half Baked Harvest
So, here is the neat recipe laid down by the author, Tieghan Gerard.
Ingredients
For the base chocolate cake, you will need:
- 2 1/4 cups (480g) granulated sugar;
- 1/4 cup + 2 tablespoons (80g) plain Greek yoghurt;
- 2 1/4 teaspoons (11g) baking soda;
- 2 1/4 teaspoons (11g) baking powder;
- 1 1/2 cups (180g) unsweetened cocoa powder;
- 1 1/2 teaspoons (7.5g) salt;
- 3/4 cup (177ml) canola oil;
- 2 1/4 cups (345 g) all-purpose flour;
- 3 eggs (at room temperature);
- 1 cup + 2 tablespoons (285ml) buttermilk;
- 1 1/2 tablespoons (22.5ml) vanilla extract;
- 1 cup (240 ml) cream soda or ginger beer;
Once you have everything for the cake, here are the ingredients to prepare a butterbeer frosting:
- 4 cups (460 g) powdered sugar;
- 1/2 cup (120ml) heavy cream;
- 1/2 cup (115g) creamy peanut butter;
- 1 tablespoon (15ml) vanilla extract;
- 1 (11-ounce) (312g) bag of butterscotch chips;
- 1 cup (120g) unsweetened cocoa powder;
- 2 cups (4 sticks) (454g) salted butter (softened to room temperature);
Lastly, to add a touch of Halloween spookiness, make sure you have:
- 4 cups crushed pretzel sticks + 1 cup whole pretzel sticks;
- 1 (8-ounce) (227g) bag of marshmallows;
- candy eyes or other decorations;
- 1/3 cup (80g) creamy peanut butter;
- 8 ounces (225g) semi-sweet chocolate chips (melted).
Step-by-step guide
Preheat your oven to 350°F (175°C). Grease three 8-inch round cake pans and line them with parchment paper. Give them a light butter or cooking spray coating as well.
In a medium-sized bowl, mix together the flour, sugar, unsweetened cocoa powder, baking soda, baking powder, and salt.
In a stand mixer or using a handheld mixer, beat the eggs, buttermilk, Greek yogurt, canola oil, and vanilla until the mixture is smooth. Gradually add the dry ingredients to the wet ingredients with the mixer on low until no flour clumps remain. Stir in the cream soda (or ginger beer) until just combined. The batter should be pourable but not overly thin.
Divide the batter equally among the three cake pans. Bake for 20 to 25 minutes until the tops are set and no longer jiggly in the centre. Remove them from the oven and allow them to cool for five minutes. Run a knife around the edges of the pans, place three large flat plates lined with wax or parchment paper, and invert your beautiful Halloween cakes bases onto the paper. Cover and let them cool completely before frosting.

Source: Half Baked Harvest
Preparing the frosting
In a small saucepan, combine the butterscotch chips and cream. Heat over low heat, stirring frequently, until melted and smooth. Remove from heat and set aside as the butterbeer sauce.
In a stand mixer or using a handheld mixer, beat the butter, peanut butter, and powdered sugar until the butter is light and fluffy (about 4 minutes). Add the cocoa powder and vanilla and continue to beat for an additional 2 minutes, scraping down the sides as needed. Add 1/2 cup of the butterbeer sauce and whip the frosting for 2-4 more minutes until light and fluffy.
Assembling the cake
Place one cake layer, flat side up, on a plate or cake stand. Spread a layer of frosting on top and drizzle with 2-4 tablespoons of the butterbeer sauce.
Add the second layer, rounded side up, and spread with frosting. Drizzle with 2-4 tablespoons of butterbeer sauce.
Place the final layer, rounded side up, and cover the cake with the remaining frosting, ensuring it's spread evenly on top and the sides. Drizzle the entire cake with the remaining butterbeer sauce.
Creating webs
Melt marshmallows in the microwave in 30-second intervals, stirring after each, until smooth. Allow them to cool for 3-5 minutes. Then, use your hands to stretch and pull the melted marshmallow around the cake in various directions to create a spider web.
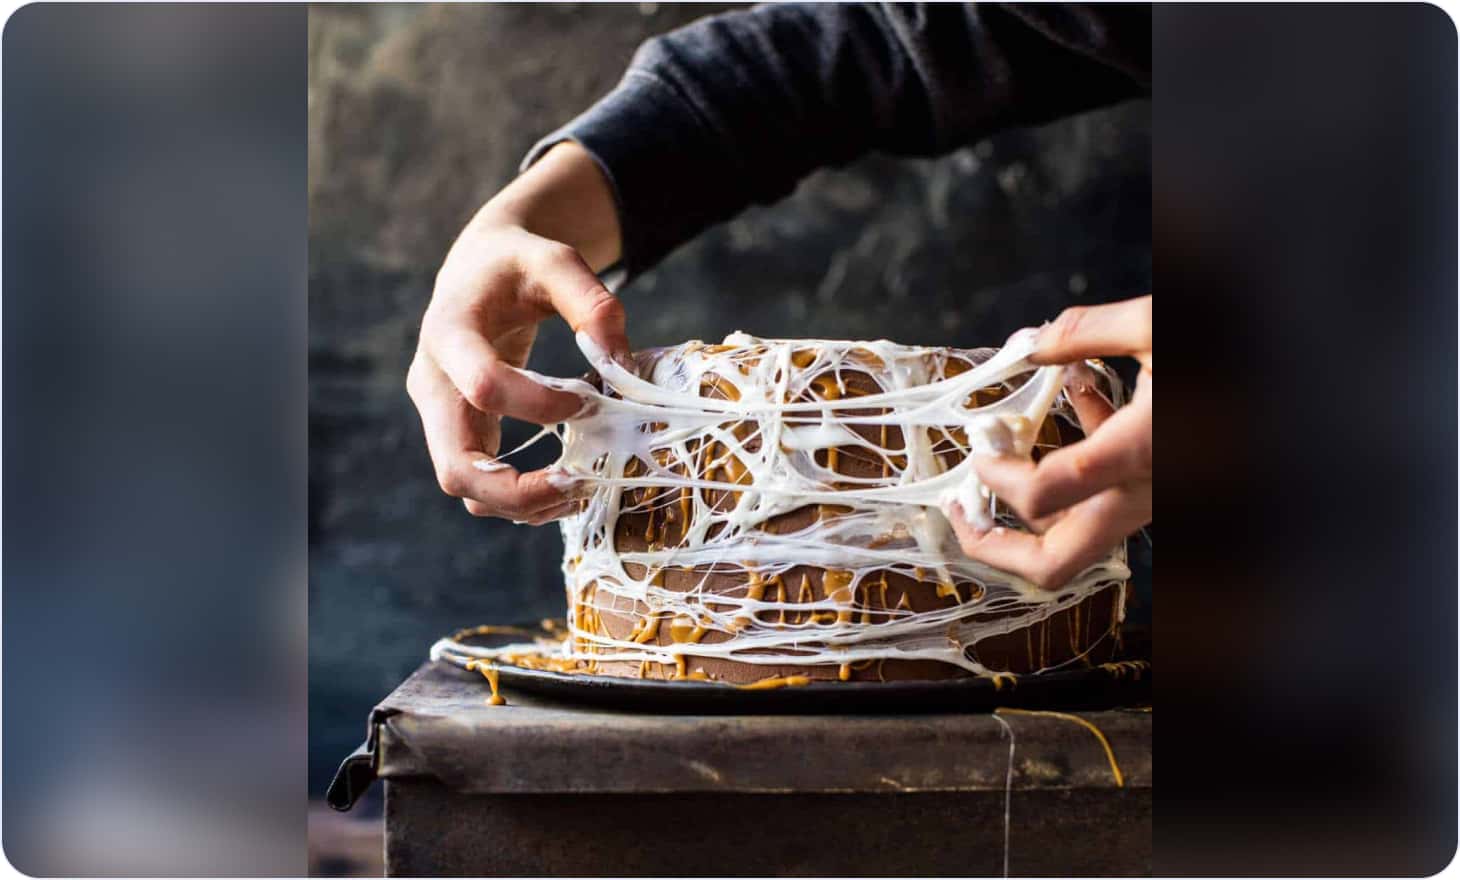
Source: Half Baked Harvest
Creating spiders
Melt chocolate chips and peanut butter in the microwave or using a double boiler. Stir in crushed pretzel sticks. Form tablespoon-sized balls from the mixture and place them on a parchment or wax paper-lined baking sheet.
Take the remaining pretzels, coat them in the melted chocolate, and attach three pretzel legs to each side of the pretzel balls. Add two candy eyes to create spider eyes. Place them in the freezer for 5-10 minutes to harden.
Creating chocolate trees
Melt 8 ounces of semi-sweet chocolate and let it cool for 5 minutes. Transfer the chocolate to a ziplock bag and snip a small corner off. On a parchment-lined baking sheet, pipe out skinny, leafless trees. Place them in the freezer for 5-10 minutes to harden.
Finale
Just before serving, place the chocolate trees around the top of the cake and decorate with chocolate spiders. Serve the cake at room temperature, and enjoy your enchanting Forbidden Forest Chocolate Butterbeer Cake!
Bottom line
That’s a wrap, but only for now! We sincerely hope you've been inspired to bring a little spooky magic to your upcoming festivities with these amazing Halloween cakes. Halloween is a time for creativity, fun, and indulgence, and what better way to celebrate than with a frighteningly delicious and visually captivating cake?
We encourage you to choose your favourite recipe or try them all, and don't forget to get creative with your decorations. You can tweak the decorations, change fillings, or add something completely new. Halloween is the best holiday to express your ideas and imagination.
Lastly, do not forget to check our blog for even more inspiring ideas for as many occasions as you can think of. We cover a lot of different aspects of cake making, ranging from creating your very own business to simple cupcake decoration ideas.